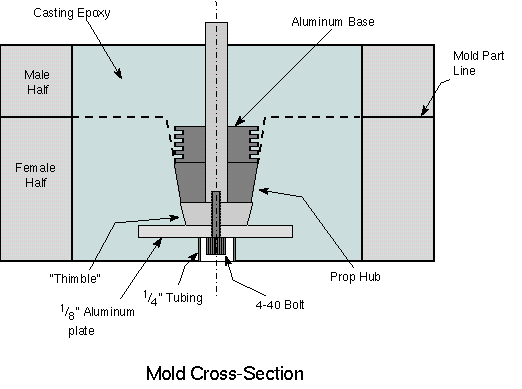
 Figure 2 illustrates what the center of the mold looks like in
cross-section. (Imagine you are looking at the mold from the end.).
 The first step in making a mold for a prop is to find a prop to use as
the master. It must be as close to perfect in pitch, size, and finish as
you can make it since it is very difficult to make the molded copies any
better than the original.
Figure 2
 Figure 2 illustrates what the center of the mold looks like in
cross-section. (Imagine you are looking at the mold from the end.).
The "Thimble" is turned out of aluminum and is sized so that it just matches the diameter of the front of the prop. (The "front" is the side of the prop which faces "front" when mounted on the model.) Its spike is the same diameter as the hole in the prop,and it tapers slightly from its base to its free end, about .004-.005". It mates with an aluminum base turned to just the size of the back of the hub of the prop. Taper on the head of the thimble is about 5 degrees.
There is a piece of .125" aluminum sheet captured in the epoxy to give something straight and hard to bolt the thimble to. The thimble is drilled and tapped for a 4-40 bolt.
The female half of the mold is made first. Find a large, thick sheet of aluminum and drill a hole in the middle just larger than the spike of the thimble. Make a shim about .125" thick and just the size of the aluminum base. Push the thimble through the prop, the base, the shim, and the aluminum plate. It helps if you make a spacer so that you can put a small bolt into the end of the spike to pull the whole stack together tightly. Next you CAREFULLY pack modeling clay under the prop blades and around the hub and aluminum base until you get a little mountain of clay with a prop on top. You don't want to flex the blades of the prop at all, so proceed slowly and carefully. Any flexing of the prop here will screw things up later.
Now you must carefully cut the clay around the periphery of the prop so that the clay "mountain" now has smooth, steep sides, about 5 degrees off vertical. What you now have is a clay/prop "model" of the MALE half of the mold.
Carefully apply some paste wax (I use Johnson Paste Wax that comes in a yellow can and which can be bought at the grocery store) and then a layer of PVA (polyvinyl alcohol) mold release agent.
Bolt the .125" flat aluminum to the thimble with the 4-40 bolt. This aluminum plate should NOT be waxed or PVAed. You must also build a mound of clay or something on top the bolt since you will be covering the whole thing with epoxy, and you want to be able to get the bolt out after the epoxy cures. I typically cut a piece of .25" brass tubing and hot-stuff it to the plate so that it surrounds the bolt. (See Figure 2)
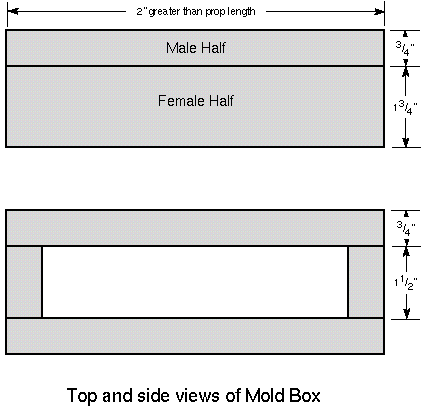
Now take the female half wood box you've previously made. It should be just large enough to surround the clay "mountain" without touching anything. Place it carefully around the "mountain" and clamp it to the aluminum plate that the mountain is built on. The joint between the box and the thick aluminum plate should be as tight as you can make it since it must contain the casting epoxy you will be pouring inside the box.
I use Hysol casting epoxy EE0061. This is a black filled epoxy made specially for molds. I use Hysol HD3561 hardener. The ratio is 5 to 1 by weight.
If you are using the Hysol, mix 50 grams of resin and 10 grams of 3561 hardener. MIX THOROUGHLY! Now carefully pour it into the mold. Turn the mold to make the epoxy flow into all of the corners and up over the prop and clay. This first application of epoxy will not even begin to fill the mold, but is about the maximum you should use to avoid an exotherm problem. Set it aside to cure. Once cured, mix and add another 50+10 batch. Keep it up, one batch at a time, until the wood box is filled. At this point, you should have a wood box filled with casting epoxy with a brass tube sticking out the top protecting the 4- 40 bolt.
As an alternative to the Hysol casting resin, you can use a mixture of epoxy and plaster-of-paris (gypsum). Place 50 grams of Shell EPON 815 in a paper cup and add 50 grams of dry plaster. MIX THOROUGHLY!. Add 7.5 grams of TETA hardener, and again MIX THOROUGHLY. Then pour as detailed above. (Note: Experience has shown that some brands of plaster work a little differently than others. Mix the plaster in small amounts until you get a consistency of cool honey: too much plaster will cause the mixture to be too thick and will not fill the mold properly. I've also found that some plaster seems to react to the epoxy, thickening dramatically. Go slow, mix in small amounts at a time.)
Unclamp the (now) female half of the mold and pop it off the aluminum plate. A light tap on the side of the mold box will usually pop it loose. Remember that the thimble may be protruding through the aluminum plate, so when you pop the mold loose, it will rotate about the thimble in the plate. Turning it over, you should see a mess of modeling clay covering the shim and the aluminum base. Carefully remove all of the clay, the shim and the aluminum base. You're finished with the shim, but the aluminum base must be cleaned for later use. Get all of the clay out of the mold that you can, but be very careful to NOT break the prop loose inside the epoxy. If the prop gets loose, you might just as well pull it out and start over again.
Once the clay is removed, apply a coat of wax and a coat of PVA over the whole thing. Then put the aluminum base back down securely over the thimble and tightly against the hub of the prop. The aluminum base should be clean and NOT waxed or PVAed. Now put the male half wooden box on top and clamp it securely to the female half of the mold. Again, this should be a good joint to retain the molding resin you're going to pour in.
Mix a batch of your casting epoxy (Hysol or the 815/plaster mix) and pour into the box, filling the male half of the mold. Roll it around to get it into all of the corners. After it cures, add another batch, and again, and again, until the mold is full.
Once all is cured, unclamp the mold, turn it over and take the 4-40 bolt out of the female half. Now you must pry the two halves apart. This is tough. I typically use a 1.5" wide wood chisel inserted between the two halves of the mold, carefully prying and propping the mold apart until finally it comes apart. Not easy, and you will wonder if you ever will get the damned thing apart! Another trick is to screw a LONG 4-40 bolt into the thimble until it bottoms (very important to bottom the bolt) in the threads, and then tap on it with a hammer to pop the thimble and the prop loose from the female half of the mold. Once apart, you must remove the master prop from the mold: it typically will be adhering to one half or the other. You may have to tap the thimble back out of the male half of the mold to get it to come loose, but since it is tapered a few thousands, it should come out fairly easily
The mating surfaces of the two halves of the mold (NOT where the prop surfaces are located) should be exact mirror images and should fit very closely. This close mating presents a problem since, when the mold is closed on a prop, there will be no place for any excess resin to go to except between the two halves. The excess resin will keep the mold from going completely closed, a Real Bad Thing. You must provide a path for excess resin to get out from between the two halves of the mold. I typically grind a LOT of the mating surface away on the female half of the mold, leaving undisturbed pads adjacent to the prop cavity on each side of the hub and on each side of each tip. This relief, typically no more than .050" or so, allows the mold to close giving the excess resin a "place to go".
A personal interpretation of this acticle by Mario Ferrero.
How to actually mould a prop by Jean-Paul Perret